
Turn on inventory if you want it
Inventory is optional — turn it on by adding chemicals to your catalog. Tap Inventory, open Inventory settings (the gear in the app bar), and use Manage chemicals to enable the products you actually stock. The same gear is home to Manage warehouses, Custom items, and Configure units, so every inventory setting lives in one place. Once at least one chemical exists, inventory tracking is live.
Add warehouses (only if you have one)
Most small companies don't have a physical warehouse — their entire stock lives on technician trucks. If you do store chemicals at one or more locations, add each location from Inventory → Inventory settings → Manage warehouses. You can add as many warehouses as you like; each one has its own name and street address.
- Admins and office staff can add, rename, or delete warehouses. Technicians can open the same sheet read-only to see where stock is kept.
- Receiving a warehouse PO routes stock to the destination you pick on the PO form. If you have only one warehouse, it is selected automatically.
- Removing a warehouse that still has stock — PoolFlow asks you what to do with the leftover quantity. Choose another warehouse, or a technician's truck. The ledger transfers every chemical balance in one atomic write so nothing is lost. The remove action is blocked entirely if you have no other warehouse and no technician to receive the stock.
What the Inventory tab shows
The Inventory tab gives you company-wide stock at a glance. Each chemical card shows the current quantity at every warehouse plus the current quantity on every technician's truck. Any custom chemicals you've added appear right alongside the built-in ones, and your custom work-order parts are listed in a Custom parts section below. Tap any row to adjust stock or open the ledger.
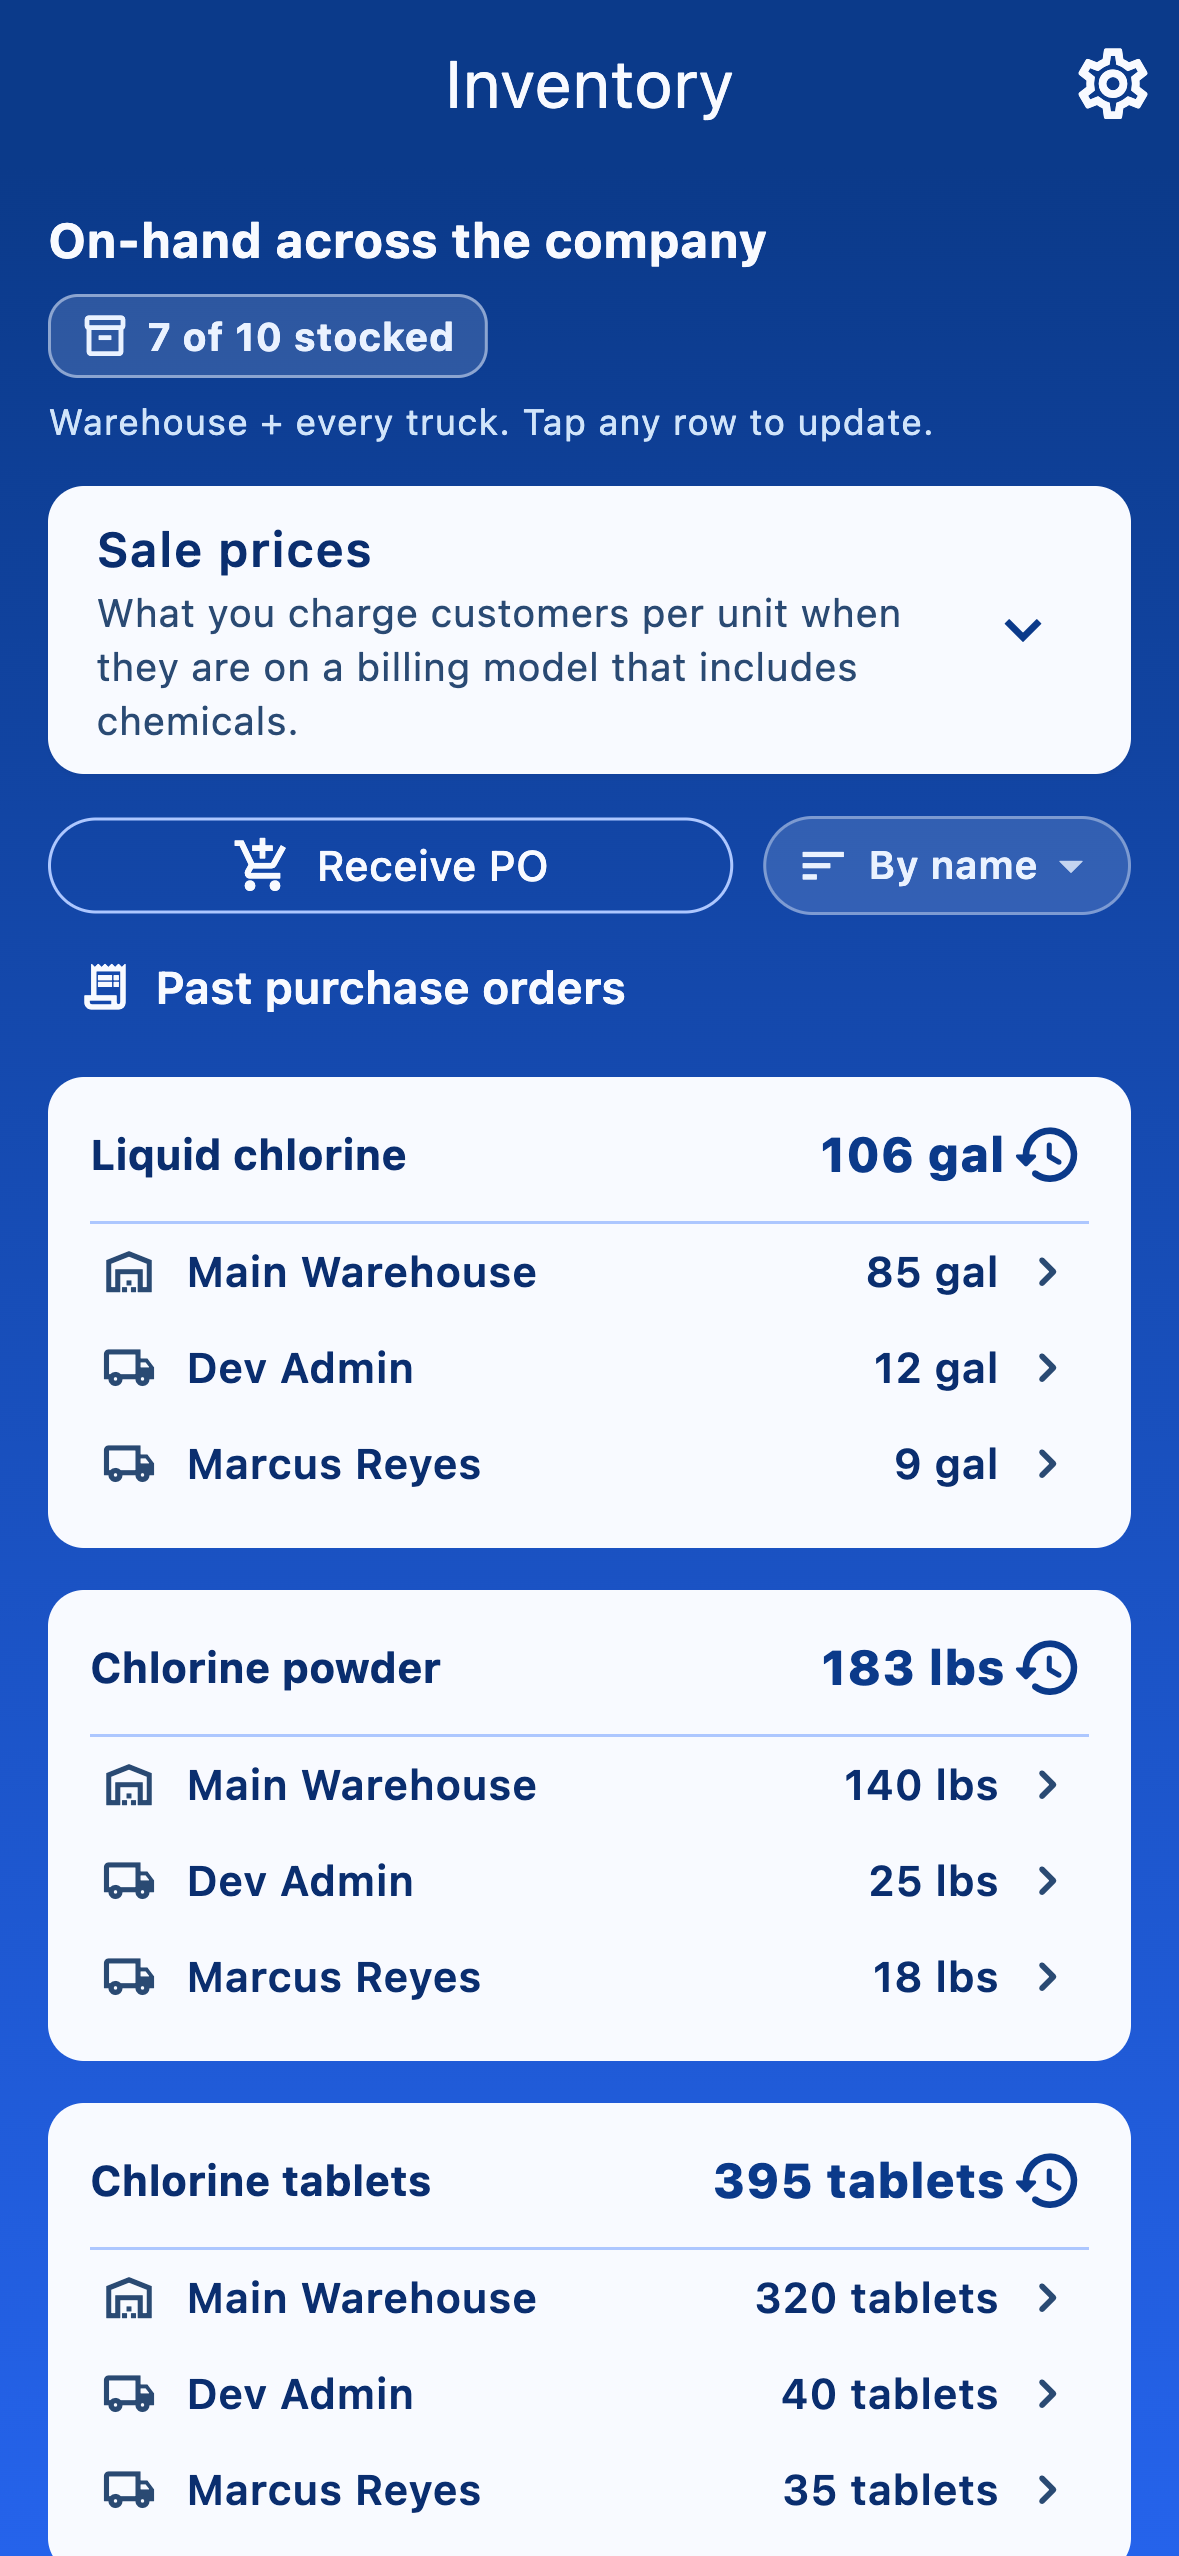
- Tap a warehouse or truck row → opens the Update dialog with a quantity field and a note (use this for physical count corrections only).
- Stock arriving from a vendor should always go through Receive PO (see below). That flow captures the per-line purchase price you paid; the manual count-correction dialog deliberately does not, so margin reports stay accurate.
- Tap View ledger → see the full audit trail of every receive, adjustment, and visit usage for that chemical.
- Want a chemical out of the way entirely? Tap Manage chemicals and toggle it off — it disappears from the Inventory grid, the truck panel, the Log Visit inputs, and the Sale prices section until you re-enable it.
Custom items: your own chemicals and parts
Beyond the built-in pool-treatment catalog, you can add your own items from Inventory settings → Custom items. There are two kinds:
- Custom chemicals— anything your crew doses that isn't in the built-in list. Pick whether it's a liquid or a powder so PoolFlow knows which units make sense, then choose the units you count it in (your custom units like jug show up here too). Custom chemicals appear with the rest of the chemicals on the Inventory tab and can be logged on a visit with the same + / − steppers as built-in chemicals, deducting from the technician's truck when the visit is saved.
- Custom parts — pump motors, filters, valves, and anything else you put on work orders. When you build a quote or work order, the part field autocompletes from this list, shows how many you have on hand, and auto-fills the price you set. The part is deducted from inventory automatically when the work order is completed.
When a work-order part you ordered arrives, mark it received and choose where it landed — a technician's truck or a warehouse. Stock increases there, and undoing the arrival reverses it. You can also move custom items truck to truck from the item's overview row when one tech needs to hand stock to another.
Configure units (and your own custom units)
Open Inventory settings → Configure units to control the units myPoolFlow counts stock in. Every built-in chemical already has sensible canonical units (gallons for liquids, pounds for powders), but you can add your own to match how you actually buy and dose.
Tap Add custom unit and give it a Name (singular) (e.g. jug), an optional Name (plural) (jugs), and the conversion under Equals — how much of the canonical unit one of your units is (e.g. one jug equals 2.5 gallons). Once saved, that unit shows up everywhere you pick a unit: receiving a PO, logging chemicals on a visit, and setting sale prices.
Set chemical sale prices (billing)
Expand Sale prices near the bottom of the Inventory tab to set what you charge customers per unit when they're on a chemicals-billing pricing model (Subscription + chemicals or Per visit + chemicals). Pick the unit each price is denominated in (gallon, quart, pound, or one of your custom units like jug), type the dollar amount, and tap Save changes. Visits only bill chemicals that have a price — leaving a row blank means that chemical isn't passed through. Only chemicals that are currently enabled in Manage chemicals appear here; hidden chemicals are excluded because they can't be logged or billed until you re-enable them.
Receive a shipment (purchase order)
When a delivery arrives, tap Receive PO from the Inventory tab and choose the warehouse or a technician truck. You can also tap a specific chemical on the overview and choose Receive PO there — the form opens with that product already on the first line. Every path records the delivery as one stored purchase order in a single save — vendor, optional invoice number, notes, every line, and optional sales tax.
- Enter the vendor, an optional invoice or PO number, and any shared notes about the delivery. The Vendor field autocompletes from suppliers you have used before — pick from the list or just type a brand new vendor and it's added to your list automatically on save (no separate Add vendor step). When the typed vendor matches a past one, empty Unit cost fields can auto-fill from your most recent purchase with that supplier (you can still change them).
- Tap Add line for each chemical received. Pick the product and enter the quantity (use the same unit the product is configured in).
- Optional but recommended: enter the Unit cost you paid per unit (e.g. $4.75 per jug). The field shows a live × quantity = total preview so you can match it against the invoice subtotal. Cost is saved on the chemical's ledger and will power margin reports later (sale price − unit cost × consumed quantity). Leave it blank if you don't have the invoice handy — that line just won't contribute to margin math.
- Optional: check Sales tax paid if the invoice included tax. The form remembers the last PO at this vendor — both whether sales tax was paid and the rate — so typing a known vendor restores Sales tax paid and the percent automatically. You can still override either on this PO; a subtotal, tax, and total preview appears before you save.
- Tap Save all. Warehouse stock updates immediately and the PO is stored so you can open it again from Past purchase orders (see below).
Truck POs work the same way. From Receive PO choose a technician instead of the warehouse, and the same multi-line form captures vendor, invoice, sales tax, and per-line unit cost — only the destination chip at the top changes. Lines add directly to that tech's truck on-hand, and the PO is stored under Past purchase orders alongside warehouse POs so you can edit or void it later.
Past purchase orders (view and edit)
From the Inventory tab, tap Past purchase orders to see every PO saved with the new flow — warehouse and tech-truck deliveries are listed together, each row tagged with its destination (warehouse, or Tech · name). Tap a row to open the same screen you used when receiving — change vendor, invoice number, notes, line quantities, unit costs, or sales tax, then Save changes.
The destination chip at the top is tappable when you edit a PO — admins and office staff can move a PO to the warehouse or to a different tech's truck if it was recorded against the wrong destination. Saving an edit reconciles both buckets automatically — the original destination is drained by the same quantities that get added to the new one, in one atomic update. You can also Void this purchase to undo the whole PO (only if reversing would not drive the bucket below zero — for example, if the tech already used that stock on routes).
Tap the Manage vendors icon in the header of Past purchase orders to clean up your vendor list — rename a typo (with an option to also rewrite the vendor on every prior PO with the old name so reports stay tidy), or remove a supplier you no longer use. Past POs keep their stored vendor name when a vendor is removed; only the autocomplete suggestion goes away.
Control what technicians can do with their truck
Open More → Settings → Technician truck inventory to set company-wide policy:
- Allow truck-only stock — when on, technicians can add product to their truck without pulling it from the warehouse (useful if they buy chemicals at a local supplier between visits).
- Allow warehouse transfers — when on, technicians can load product from the warehouse onto their truck and return unused stock at end of day.
Admins can always adjust any inventory from the Inventory tab — these toggles only affect what technicians see and can do.
Reading the ledger
The ledger is the audit trail. Every line shows who did what, when, and why — a warehouse receive, a transfer to a truck, a chemical used on a visit, or a manual adjustment with a note. If a number ever looks wrong, the ledger is where you find the answer.